(Previous Topic: Post/View Login Data)
Posting Sales Data
The data read from the Restaurant Manager Point of Sale (POS) system is to be sent to QuickBooks as a General Journal Entry. Refer to the QuickBooks reference manual for more information on this regard.
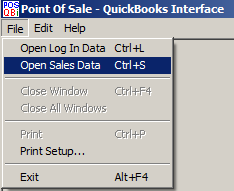
To post sales data to QuickBooks, click on File > Open Sales Data or press Ctrl-S. The Sales Data window (see below step 6) will be displayed. More detailed information for posting to QuickBooks is outlined in the following sections. For now, here are the few steps required to post sales data.
- Bring up the Sales Data window by clicking File > Open Sales Data or Ctrl-S.
-
Set the starting date of the period using the calendar drop down menu of the "From" field setting or manually enter the date.
-
Enter the ending date of the period using the calendar drop down menu of the "Up To" field setting or manually enter the date.
-
Click the [Get Data] button.
-
Check the Preview Data checkbox.
-
Proceed posting by clicking on [Post To QB] button.
- In the Preview Sales Data window, complete the process by clicking on the [Post to QB] button. This step is only necessary if you have Preview Data enabled on the Sales Data window.
If problems are encountered, check these against Warning and Error Messages
It is highly suggested (if not mandatory) that you do a company back up before posting to QuickBooks form POSQBi the first time. This precautionary step will help recover business data in the event data in POSQBi was mapped to the wrong QuickBooks accounts.
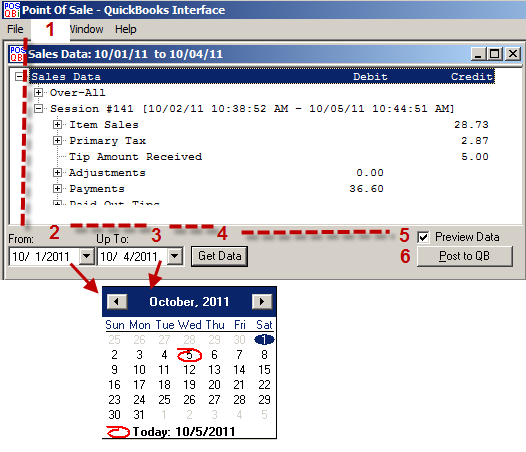
The Sales Data Window
The purpose for the functions on the Sales Data window are:
-
From- Use to set-up the starting date for the period of the data to be processed. Click on the down arrow to produce a pop up calendar. You may also enter the date manually in this data entry field.
-
Up To- Use to set-up the ending date. Click on the down arrow to produce a pop up calendar. You may also enter the date manually in this data entry field.
-
Get Data button- Click to retrieve the data for the specified period (entered in the "From" and "Up To" fields).
-
Preview Data checkbox- if checked displays a preview of the data after pressing [Post to QB] button
-
Post to QB button- if the Preview Data checkbox is not checked the system proceeds to posting the current data to QuickBooks. If Preview Data is enabled, you will be directed Preview Sales Data Window where you can review data in a debit/credit format.
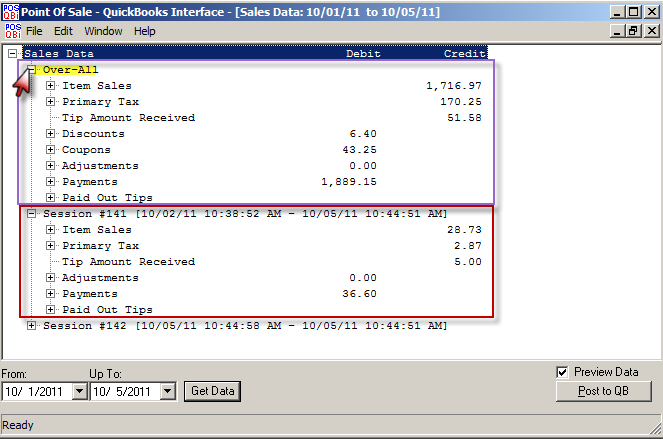
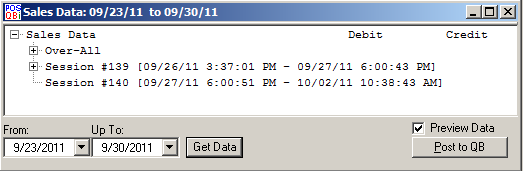
- Sales Data Display Area- When the Get Data button is clicked, the Sales Data window will be updated to show the data (see below). The Over-All line under the Sales Data tree view contains the information for the whole period. While below it, the daily information will be displayed individually.The information on each line can be further detailed to show the break down. To show the breakdown, click on the plus (+) sign to the left of the Over-All line. When done, the window would be updated to show something like the image below.
The information on the Sales Data window can be printed by using the Cntrl+P keyboard commands.
Sales Data Preview
When the Post to QB button is clicked and the Preview Data check box is also checked, the Sales Data Preview window will be displayed . The preview provides a quick look at the information that will be the basis in creating the general journal entry to be posted in QuickBooks. It shows the detail of the item entries, the account name as well as the amount to be debited/credited.
For each session, a total is provided as well as the grand total for the whole period. At the bottom of the preview, a warning will be shown in case the total amount for debits does not equal to the total for credits.
The [Post To QB] button on the preview window performs the posting to QuickBooks action, the [Print] button to generate a print-out of the displayed preview information and the Close button cancels the posting and closes the preview window.
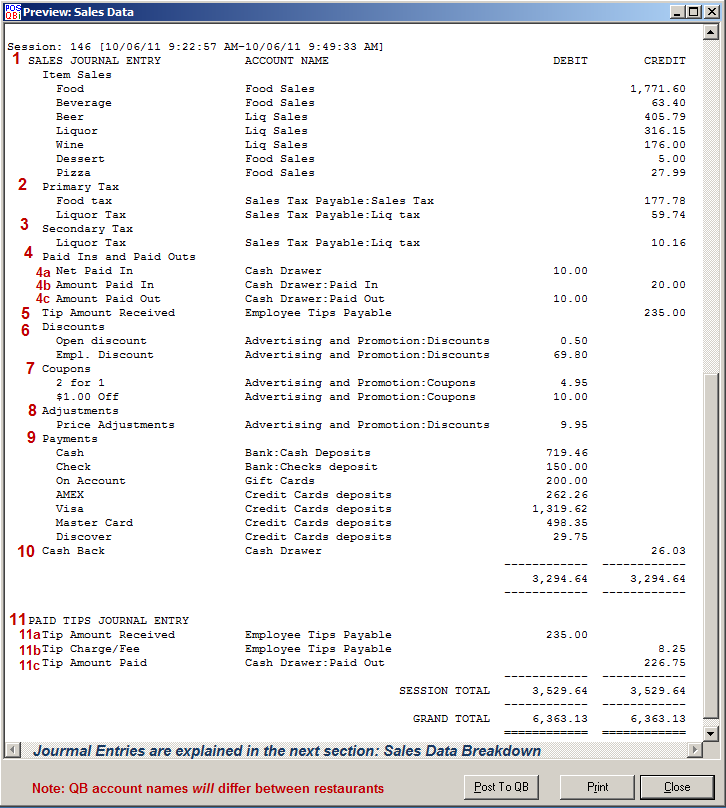
Sales Data Breakdown
Numbers next to entry items above correspond to the number list below. The sales data displayed on the Sales Data window can be broken down into:
-
Item Sales – a credit line showing the total item sales amounts from the data retrieved. Can further be broken down into item groups and assigned accounts as defined in Setting-Up Groups (Items).
-
Primary Tax – a credit line showing the total taxes withheld based on the primary tax table. Can also be broken down into the primary tax types and assigned accounts as defined in Setting-Up Taxes.
-
Secondary Tax – a credit line showing the total taxes withheld based on the secondary tax table. Can also be broken down into the secondary tax types and assigned accounts as defined in Setting-Up Taxes.
- Paid Ins and Paid Outs- this line entry can be broken down into three separate categories depending on how this was configured in the Paid Ins/Out section under the Sales Tab in the Setup form.
-
Tip Amount Received – a credit line showing the total amount of tips received based on sales records specially those involving non-cash transactions. Account to be assigned is as defined in Journal Entry Tip Handling for Tip Liability Account.
-
Discounts – a debit line showing the total amount of discounts for both check discount and item discounts. Can also be broken down into the different discount types and assigned accounts as defined in Setting-Up Discounts.
- Coupons- a debit line showing the total amount of coupons. Can also be broken down into the different coupon types assigned accounts as defined in Setting-Up Coupons.
-
Adjustments –a debit line showing the total amounts incurred for doing a 2 For 1 Discounts and/or Price Adjustments.. The accounts to be assigned is as defined in Miscellaneous Sales Settings for 2 for 1 Discount and Price Adjustment, respectively.
-
Payments – a debit line showing the total amount of payments received from the retrieved data for the period. Can also be broken down into the different payment types and account assignment as defined in Setting-Up Payments.
-
Cash Back – a credit line showing the total amount of cash given to the customer as cash back specially on debit card transactions. Account to be assigned is as defined in Miscellaneous Sales Settings for Cash Back.
- Paid Tips Journal Entry –if the setting Create Journal Entry For Tips in Journal Entry Tip Handling is checked, this would be displayed and can broken down into:
Tip Amount Received – a debit line showing the amount of tips received. A contra-transaction to offset the amount shown in number 5 above. The account assigned is as defined for Tip Liability Account in Entry Tip Handling.
Tip Charge/Fee – a credit line showing the amount of tip fees being charged by the restaurant against the employee tips specially for credit card transactions. Though normally, the account assigned for this of an Expense type, the amount shown here would decrease the restaurants’ tip charge expenses as a portion of it would be passed back against the employees tips. The account assigned is as defined for Tip Fee Expense Account in Journal Entry Tip Handling.
Tip Amount Paid – a credit line showing the tip amount received less the tip charge/fee that is to be paid to the employee. The account assigned is as defined for Paid Tips Source Account in Journal Entry Tip Handling.
Debits and Credits
Since, at the very basic, this is an interface to a popular accounting package, it can not be avoided that the terms debits and credits, in one way or another, be encountered. However, the following should be easy to remember:
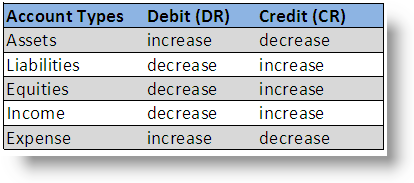
For any transaction to be valid, the totals for all debits and credits should be the same for it to be considered “balanced”. Otherwise, the transaction will be rejected by QuickBooks or any accounting package for that matter.
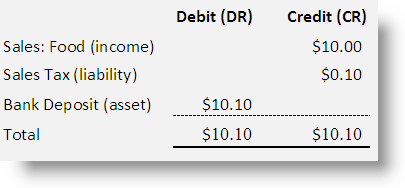
For example, consider a transaction consisting of a food sale of $10.00 a tax of $0.10 and paid in cash. The transaction would look like this:
Sales Journal Entry
The interface (POSQBi), posts the data by requesting QuickBooks to create a general journal entry while providing it the information as to what it should contain. In the preview below, two (2) general journal entries will be created, one for each day.
The image shown below is a screen shot of the created general journal entry in QuickBooks for Sept 29, 2011. To access in the QuickBooks user interface, click on Company > Make General Journal Entry.
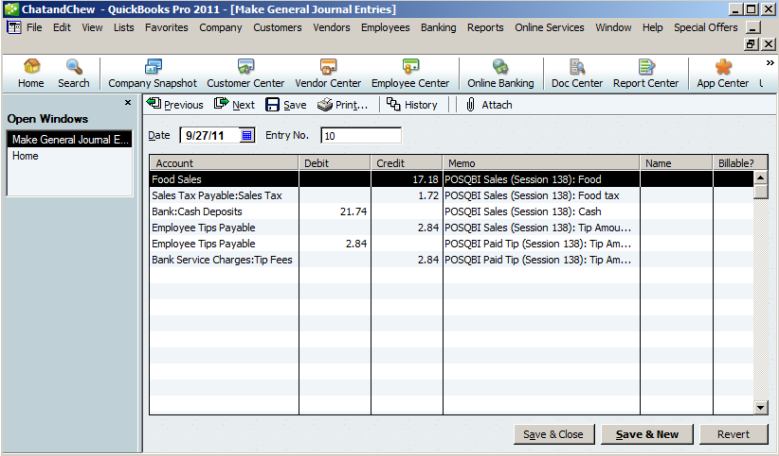
On the Memo column of the generated general journal entry, the entries that start with POSQBi Sales (Session <nnn>): are those entries from the Sales Journal Entry in the preview screen.The entries that start with POSQBi Paid Tip (Session <nnn>): are the entries from the Paid Tips Journal Entry portion.